Pages

Monday, February 13, 2012

Random Winter 2011 pics

Here are a few pics from December 2011...Very late Post...


7th Birthday Pictures--Very Late Post!

FINALLY! Here are the pics from Bayleigh's 7th Birthday Party from back in November!


Thursday, February 9, 2012

Walk-A-Thon Winner!

WES hosted their first ever Walk-A-Thon on Monday, Feb. 6th, 2012. For a couple of weeks prior to the Walk-A-Thon students collected sponsorships from friends, family, and neighbors to help raise money for the event. If student's raised $25 they got a T-Shirt that said Super Walker with the event information on it. For every $100 in sponsorships the students got their name put into a random drawing to win a 19 inch flat screen TV. Bayleigh raised $173 for the school. She did a great job! At the end of the day, her principal drew a winner out of the $100 collectors and Bayleigh WON! YAY Bayleigh!!! In addition to winning the TV, during the Walk-A-Thon, which took place during specials times with the entire grade getting together, there was a hula hoop competition and also a volleyball competition during the Walk-A-Thon that students could participate in if they choose too. Bayleigh won the hula hoop competition out of her whole grade as well! For that she won a glow necklace. When I brought her home after school she was so excited and said, "Mom, Monday must be my lucky day"! :D I think she's right! Good Job Bayleigh!

3rd Lost Tooth!

Bayleigh lost her 3rd tooth on Super Bowl Sunday! Feb. 5th, 2012! If you're looking at her it's her second tooth on the right on the bottom! I was preparing food because a couple of friends were coming over to watch the Super Bowl with us and I knew that the tooth was very loose. Bayleigh was putting lip gloss on and then next thing I know she goes, "ahhhh, IT CAME OUT"! I said, what came out? And she said her tooth! :D
The first thing she did again was whistle to make sure she still could! :D Next, we busted out the camera to get shots of her little "window"! As you can see...the pic I am using came from my cell phone because I have not downloaded the pics off the camera yet.
The tooth fairy brought her $3 for this tooth! She was so excited!

Wednesday, February 1, 2012

Coasters and Pendants

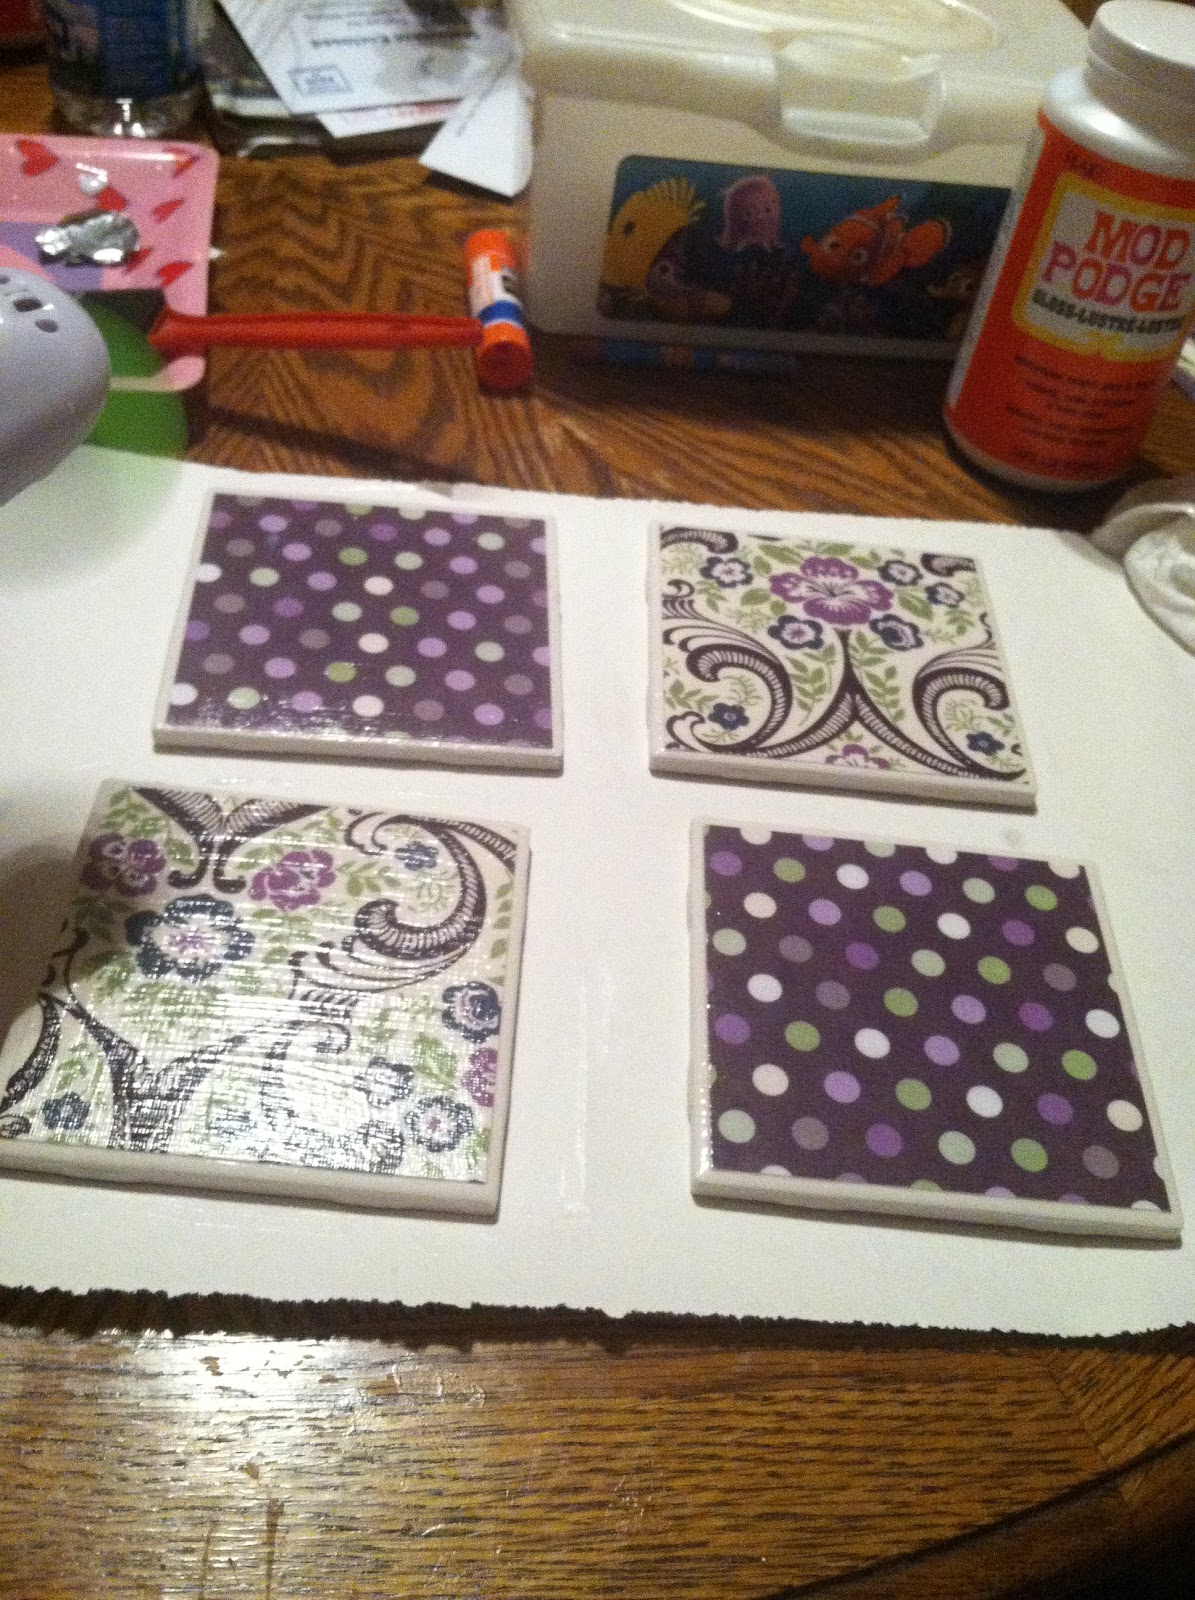
It's no secret that I am obsessing over Pinterest right now. My friend Jodi, aka Martha 2, and I have been crafting on Tuesday nights for awhile now and Pinterest has been behind my craftiness. Here's our latest crafts and how to do them...
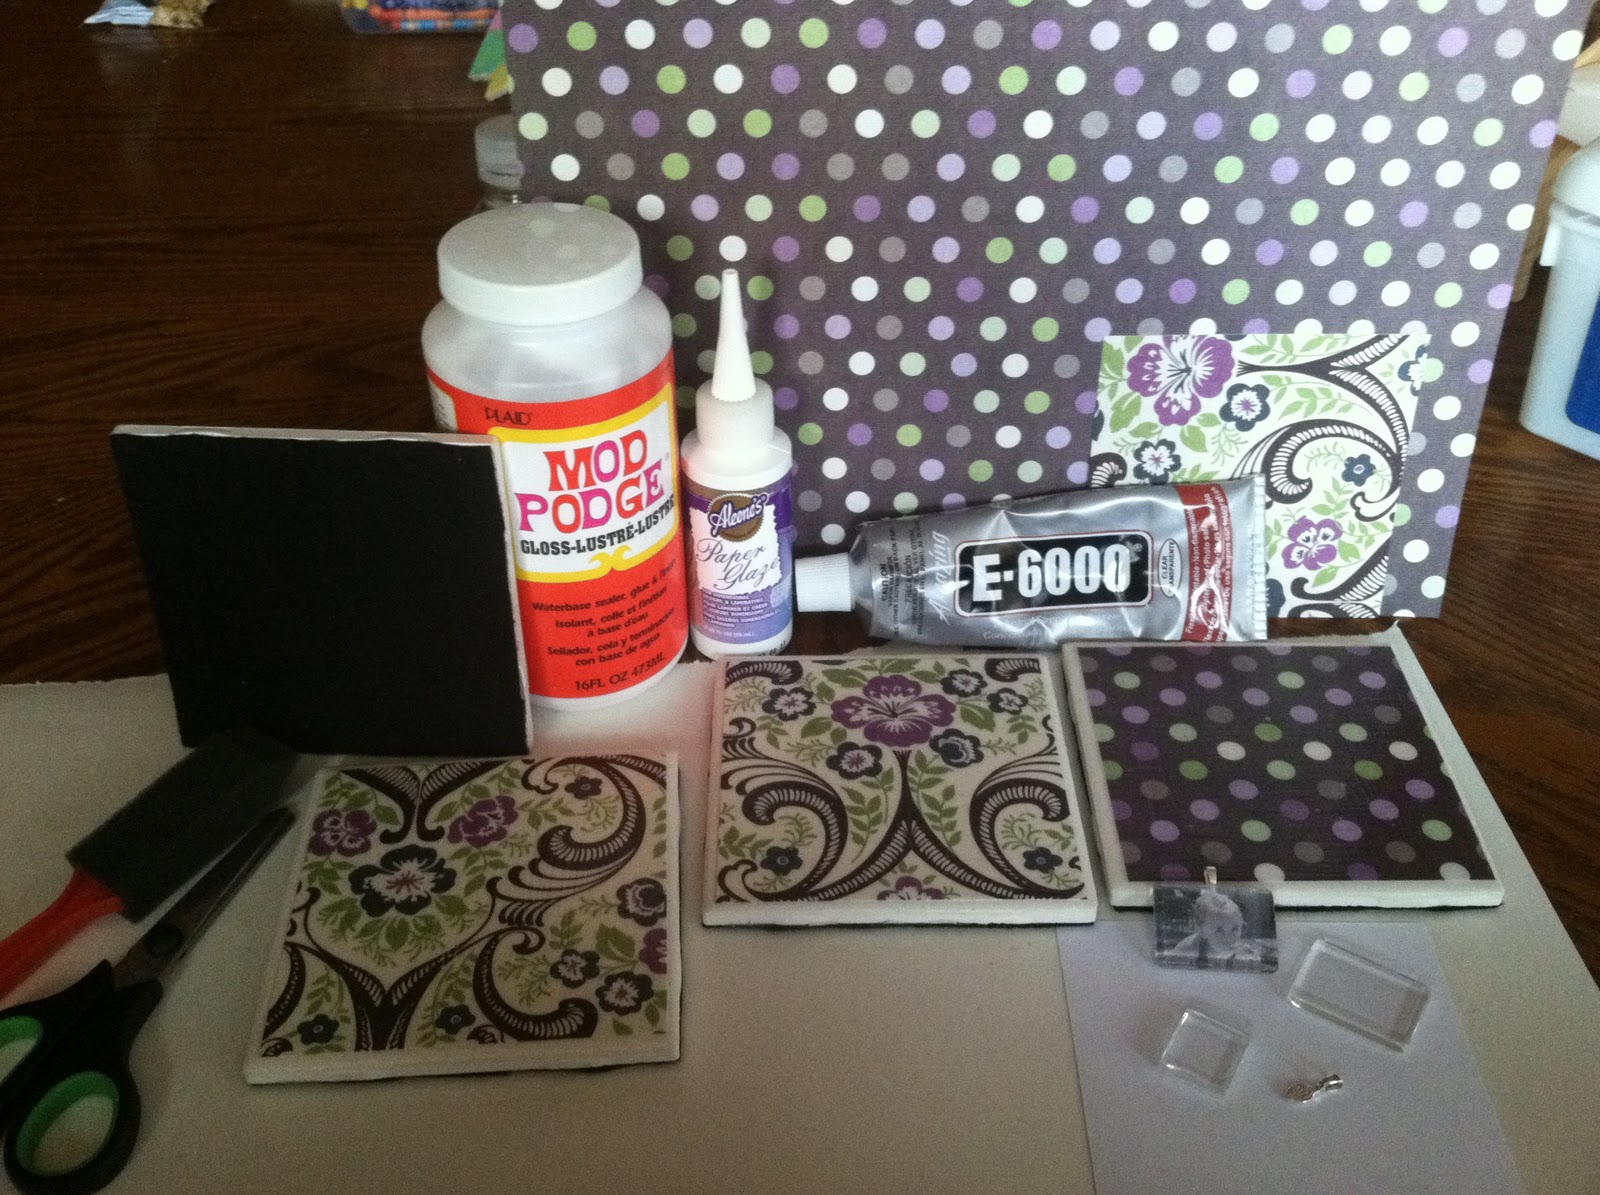
Coaster and Pendant Materials, minus clear spray paint.
COASTERS:
Materials Needed:
4x4 tiles, (Lowe's Flooring Dept. around $0.16 each)
Scrapbook Paper OR Photos--(photos are next on my list)
Mod Podge
Scissors
Felt
E-6000 (I'm trying a hot glue gun next).
Foam Brush
Clear Spray Paint--not pictured.

*Start by cutting your scrapbook paper or photo down to a 4x4 square.
*Next, Use the foam brush to brush a layer of Mod Podge over the tile. Make this layer thin.
*Place the scrapbook paper or the photo onto the Mod Podge and press down firmly. Smooth it out so that there are NO lumps or bubbles.
*Next, use your foam brust to paint a layer of Mod Podge over the top of the paper or photo. Try to make it smooth. It does dry clear, but it will be textured if it's not smooth, which I really liked, but others may not.
*Once that is dry, it will be clear so you will know, then do it again. Add about 4 layers of Mod Podge to your tiles. It takes around 20-30 for each layer to dry throughly.
*After the top is complete, cut the felt to 4x4 squares for the back. I found it easiest to hold a tile on the felt and cut around it and trim it later. (that's gonna be bigger than 4x4).
*Use the E-6000, I'm trying a hot glue gun next time, to attach the felt to the bottom of the tile to protect surfaces.
*Once that is dry trim the extra off so that you can't see it while it sits on the table.
*In the next day or two, after the Mod Podge has had time to really dry throughly add a coat of clear spray paint. I have not done this yet because I just did my coasters last night so that will probably happen tomorrow night for me. :)
I am not making a direct link to the original how to on these coasters because when I click it on Pinterest to take me to the blog it is not there. Basically, I'd be wasting your time. :)

PENDANTS:
Materials Needed:
Glass tiles, Purchased from Sun and Moon Craft Kits
Metal Bails, Also purchased from Sun and Moon Craft Kits
Photo, or scrapbook paper
Paper Glaze
E-6000
Scissors
Small Brush

First, I have to shout out to Sun and Moon Craft Kits. I am in no way, shape, or form affliated with them, but when I get great service I tend to brag about it. I ordered my tiles and bails on a Thursday and they were here a few days later on Monday. Super fast shipping and the coast is VERY afforable! I think I paid $5 for 20 tiles and the bails were just $0.14 or $0.16 each. Seriously, order from them! :)

Ok, onto the how-to!

*Select your photo and print. I used Windows Live Photo Gallery because when you select print from there and one of the options is print size and there is an option that has a page of little tiny pictures. OR you can cut a piece of scrapbook paper down to fit.
*Clean your tile
*Cut your photo so that it fits the bottom of your tile. I made mine a hair smaller so that there is a clear edge around it so that later I could seal the edges good.
*Use the Paper Glaze and apply to the bottom of the tile. I just put a blob in the center.
*Next, stick the tile onto the FRONT of the photo. Here is where I squished it around some to cover the photo and the back of the tile completely. The extra cleans up easily with a wet wipe or rag as long as you do it right away. TRY TO NOT GET THE PAPER GLAZE ON THE FRONT OF THE TILE AT ALL!!! I am sure it will clean up if you do the clean up immediately, but why risk it really...
*Let that dry
*Once it is dry brush a thin layer of Paper Glaze over the back of the photo. Make sure you cover the edges of the photo too because this is going to seal it and make it water proof. (I've not had mine in water, but that is what I was told)!
*Let that dry
*Paint more layers of Paper Glaze onto the back. I probably used 5-6 layers because mine were very thin. Make sure to let it dry completely between layers!
*Use the E-6000 to attach the metal bail to the back of the photo. This needs to sit for about 24 hours to cure before doing anything else. If you don't let it set up then it's not going to bond right...trust me, I know!
*Next, add a couple of more layers of paper glaze over the back again and over the bail. I am not sure you HAVE to do this, but I feel it gives it more hold. Again, let it dry completely between layers.
*Attach to a necklace or bracelet and enjoy!
I couldn't get a great shot of mine, but you get the point.
Click HERE if you want the original directions from Pinterest.

Ok, so there you have it. Two VERY afforable, very nice, could be very personal craft ideas! I am very excited for the Christmas season now because my friends and family are getting some more homemade crafts! Yes, I know it's only February! :)


**Coaster Update 1.16.13**
I have found that instead of cutting and gluing felt to the bottoms of the coasters, it is easier to buy the felt pads from the hardware section on your local store that goes on the bottom of furniture to protect your floors works better. I bought 160 from Wal-Mart for $9 and some change!
I'm updating from my phone so I hope the picture uploads in the right spot!

Monday, January 23, 2012

New Blogger Closing!

As mentioned a few posts back...I've finally made a new blog post closing! Hope you like it! I love the bold colors!
You might have to double click to read the fine print still, but I hope not! And now, here it is...


Monday, January 16, 2012

She Can Be Taught!

I am BEYOND excited to be writing this post! As I sit here and reflect on Bayleigh, I am seriously beaming with pride and as I type, I am choking back my tears!
The Friday before last week, in the Friday folder that had the awesome report card, Bayleigh brought home a Math test that she earned a 50%--U on. You know what that means...this 9 weeks begins with a 50% grade. I was NOT happy to say the least. I didn't yell at her or get mad, but I did let her know that it is unacceptable and that it is NOT OK to bring home grades like that.
So, then this past week--STRUGGLES! She simply did not understand the subject of One and Ten Spots. I ended up on Thursday working with her from the time she got home from school until 9:30 with the exception of 2.5 hrs that we took her to gymnastics. I also placed a call to her teacher before she left the school because I had no clue how to teach her. I didn't know what to say or how to explain it at all. My vocabulary was clearly not what the teacher was using. Bayleigh was frustrated with me and I was beyond frustrated with her as well. Luckily, her teacher was VERY understanding and even finished my sentence when I said, Mrs. Linder, this math homework...she said it's hard! Yeah! She helped me explain it and gave me some tips to remind Bayleigh of and even pointed out to me where she was struggling--which was a great start for me because I had no idea what she was doing. Ends up...the topic is Ones and Tens spots and Bayleigh was wanted to add ones and/or tens to both spots when it just needed to be in just one or the other depending on the question. I could tell from her paper in the Friday folder the following day that she did much better, but knowing Bayleigh--I could tell she still just didn't get it. It wasn't "clicking for her". UGH!
So, this weekend we did math. And, it's MLK Day so there was no school today and we hit it again today. While talking to one of my BFF's, I told her of our issue and she pointed me to this site she found on pinterest.com. Click HERE to go to the exact blog page if you want to. Score! FINALLY! A hands on tool that actually helped! THANK YOU FRIEND!!! <3!
I have to tell you--watching Bayleigh learn tonight has brought on a wave of emotion that I am kind of surprised by. I am seriously overwhelmed with pride! With Bayleigh, it's always just seemed as if she just wakes up and KNOWS things. She is the type that catches on very quickly and just "gets" it. You know what I mean? I am sure that this just fueled her own frustrations when she wasn't getting the ones and tens spot lessons.
Now on to the trick...the tool...
It calls for styrofoam cups, but I only had solo cups, so I put a piece of tissue paper in the bottom of one to keep them from collapsing into the other.
What you do is...
1. On two, (3 if you do the hundred's spot too), cups--along the top rim where you drink write the numbers 0-9.
2. Place the cups into each other with the open end or the part with the numbers facing your left hand when looking at them.
3. The cup on the outside--the numbers on the right are the One's spot.
4. The cup on the inside--the numbers on the left are the Ten's spot.
5. Twist the cups to create a two digit number. Example 71.
6. Ask the question What's One More Than 71? At this time, the child will know that he or she must turn the ones cup up one number to equal 72.
7. Have the child reset the cups to 71. Then ask, What's One Less than 71? At this time, the child will know that he or she must turn the ones cup down one number to equal 72.
8. Have the child reset the cups to 71. Then ask, What's Ten More than 71? At this time, the child will know that he or she must turn the Tens cup up one number to equal 81.
9. Have the child reset the cups to 71. Then ask, What's Ten Less than 71? At this time, the child will know that he or she must turn the Tens cup down one number to equal 61.
**On a side note, if you click the link above to go to the ladies blog where I found the tutorial...she used the styrofoam cups that have the rims that prevent the cups from collapsing into each other AND she used different color pens for the Ones, Tens, and Hundreds spots. Great idea!
Here shows what the outside of the tens cup looks like too. The 0's are hidden on the inside of the ones cup when you line the numbers up as you can see in the previous picture.
This tool worked great for Bayleigh and I was even able to ask her several numbers in a row and she gave the correct answers without the cups! SHE OVERCAME HER STRUGGLES! I watched her learn and be so proud of herself right in front of my eyes...it didn't happen over night while she was sleeping! Heeeheeeheee!
I am SO incredibly thankful to the author of that blog for showing us mommies the tools that worked for her. I hope that should another mommy somewhere, someday need these tools she too will stumble across my blog and find herself completely proud of watching her child learn as well. (This goes for daddies too of course)! Next week's lesson is similar except they are using a Hundred's chart to get the answers...Wish us luck!
*Double Click To Read The Fine Print*